

[Re-posting the following with some updates.]
The following are a few tips for WordPress.com newbies that I had to find by trial and error:
- The Reader
- Tags
- Categories
- Blocking Sites in the Reader
- Comment Signatures
- Administrator Panel
- Threaded (Nested) Comments
- Comment Moderation
- Manage the Blogs You Follow
- Blogroll and Links
- Shortlink
- Continue Reading
- Emoji
- How to Add an Image to a Comment
- Email Notifications Management
1. THE READER
The Reader is a fantastic way to find and follow great Blogs and to be found by potential followers and readers. Some overlook this function.
If you include Tags in your post, your post will be displayed in the Reader. When you first click on the Reader, it defaults to your “Followed Sites,” which displays a chronological listing of posts by the Blogs you follow. You can further filter these posts by Tags (discussed below).
If you want to discover new Blogs, click on “Discover” and filter the results by Tags (see below). If you don’t filter the Discover feed, you will see a select group of Blogs. If you filter the Discover feed by Tags, you will see all posts using that Tag (not limited to Blogs you follow) in chronological order.
You can also click on “Recommendations” and find Blogs similar to the ones you have followed or liked.

2. TAGS
Tags are very important for many reasons, including for search engines. But one of the biggest benefits is they make your content more visible to potential followers and readers within the WordPress world.
In the WordPress Reader, you can filter content by tags. So, if I select “Discover” and the “Christianity” tag, the Reader content will be filtered to all posts having that tag. You can filter the “Followed Sites” feed the same way. I rarely review the Reader feed without tag filtering.
You can also create a List of Tags, which enables you to filter the Reader by multiple Tags at once (for directions on creating Lists, see Item 9, below).

So, make sure you include tags in your posts. However, be aware that if you add more than 15 Tags and Categories (collectively) to your post, the Reader will not display your post (Click HERE for official WP explanation).

3. CATEGORIES
Some people confuse Categories and Tags. Tags are more about the searchability of your posts; whereas Categories are more about organizing your posts. By setting Categories, your Blog can then be filtered by those Categories. For example, you can add any or all of your Categories to your Blog’s Menu, and then followers can click on the categorical content they want to view. Below is a screenshot of my Blog’s Menu with Categories.

You add Categories to your posts just like you do tags (see screenshot in Tags tip, above).
On my Blog, I actually added a Category named “Categories”, added that Category to the Menu as a “parent,” and then added sub-Category items (child) to that parent Category in the Menu.
However, a much simpler way to do this is just to add your Categories directly to your Menu, then, when a follower clicks on the Menu item, all posts under that Category will be displayed.
To do this, click on “Menus” in your Dashboard; click the “+” beside the Menu item that you want your new item to precede or follow on the Menu; you will then be asked to “add menu item above” or “add menu item below”; after choosing the location, select “Category” from the drop-down window; then select the Category you want to appear in your Menu.


You can also add your list of Categories in your Sidebar or Footer by means of the Category Widget.
4. BLOCKING SITES IN THE READER
Have you been annoyed by a particular Blog that hogs Reader space with multiple posts or multiple tags, or by a Blog that has offensive or uninteresting content? You can easily remove that Blog from the Reader as follows:
In the Reader, look for the dots beside the offending Blog Post, click on those dots, click on “Block Site,” and the offender disappears forever. Oh so wonderful!

5. COMMENT SIGNATURES
One challenge in Blogging is developing a loyal following. One way to increase traffic to your Blog is to visit others’ sites and comment. The more you interact with others, the more they will interact with you. Also, other bloggers may see your comment and investigate your Blog.
One non-intrusive way of increasing traffic is to include in your comment a link to your Blog, to your most recent post, or to one of your posts that might be relevant to the post you are commenting on. So how to do this? Pretty simple. You just need to enter the HTML code for your post link in the comment bubble. Here’s how:
The HTML code will look like the highlighted portion below (ignore the comment typo–geeze):

Just insert your post URL between the quotation marks in the highlighted code above and your post title before the </a>. Replace the bold type below with your information (make sure to keep the quotation marks):
<a href=”YOUR POST URL ADDRESS/”>POST TITLE</a>
You can place that code anywhere in the comment bubble. When you submit the comment, it will change to a link as follows:

[NOTE: THIS TIP SHOULD NOT BE INTERPRETED AS ENCOURAGEMENT OR A LICENSE TO SPAM OR ADVERTISE ON ANOTHER BLOGGER’S SITE. LINKS TO ARTICLES SHOULD NOT BE INCLUDED IN COMMENTS UNLESS THE CONTENT IS HIGHLY RELEVANT TO THE POST YOU ARE COMMENTING ON. SIGNATURE LINES (SUCH AS A LINK TO YOUR BLOG OR RECENT POST) SHOULD BE MINIMAL–SHORT, SWEET AND DISCRETE. DON’T GET ALL FANCY WITH ELABORATE HTML CODES, WITH COLORS, BOLD TYPE, MULTI-LINES, ETC. THE COMMENT SHOULD BE FOCUSED ON THE CONTENT OF THE AUTHOR’S POST. SPAMMING AND BLATANT ADVERTISING ARE FROWNED UPON BY WORDPRESS AND THE BLOGGING COMMUNITY AT LARGE. SOME MAY DISAGREE, BUT I BELIEVE A SHORT AND SIMPLE SIGNATURE LINE IS PERFECTLY ACCEPTABLE.]
6. ADMINISTRATOR PANEL
One great WordPress function is the Administrator Panel, which, for some reason, I always have a hard time finding. To get to this panel, simply type “/wp-admin” at the end of your Blog home address in the URL window and press enter.

This Administrator Panel has a treasure trove of information and functionality. You can access some of this information in your regular Dashboard, but the Admin Panel is more robust. Unfortunately, the Admin Panel does not work well on a mobile phone, so you may need your iPad (or other tablet) or your computer, but you can access the Admin Panel on your mobile device by going to the web version of WordPress instead of using the mobile app.
7. THREADED (NESTED) COMMENTS
Have you ever engaged in a discussion on a Blog post and the person you are trying to respond to no longer has a “Reply” button? It usually takes a few replies before this happens. The bad thing about that is you then have to back up several levels and make a new comment, and the person you are trying to respond to may never receive a notification of your response because you were not able to reply directly to his or her comment. This problem is due to the “nesting” setting for the Blog you are commenting on. Many have this nesting set to 2 or 3 levels, which I find too restrictive if a post generates a lot of enthusiasm.
So, here is how to set that on your own Blog. Go to the Admin Panel (see above instructions), click on “Settings,” then “Discussion,” enable “nesting” and set the number of levels–I recommend at least 5.

8. COMMENT MODERATION
If you want to review comments before they are posted to your Blog, you can enable “Moderation,” which requires you to approve the comment before it becomes public. Lots of people have this enabled. I don’t because I think people like to see their comments immediately pop up. If I get to the point where I receive bad comments, I may change this. For now, I like Moderation off. There have only been a few comments I did not like, and I can simply “Unapprove” them and they go to a moderation status.
To set Moderation on or off, go to the Admin Panel (see above instructions), click on “Settings,” then “Discussion,” and check the radio button or buttons highlighted below that you prefer:

The comments waiting for moderation will show up in your Admin Panel under “Comments.”
9. MANAGE THE BLOGS YOU FOLLOW, INCLUDING EMAIL SUBSCRIPTIONS
Most of us follow a lot of Blogs. We do this because there are a lot of good Blogs out there, but we also do this in order to develop a following ourselves. Despite following a lot of Blogs, most Bloggers have a much smaller go-to list of Blogs. Therefore, they don’t want email notifications from every Blog they follow. They also may want to form a short-list of go-to Blogs in the Reader. Both of these can be easily accomplished through the regular WordPress Dashboard.
Click on “Reader,” then “Manage” out beside “Followed Sites.” This will populate a list of all the Blogs you follow. Beside each Blog will be a down arrow; click on the arrow and you will have the choice to toggle email notifications on or off. I set this every time I follow a new Blog.

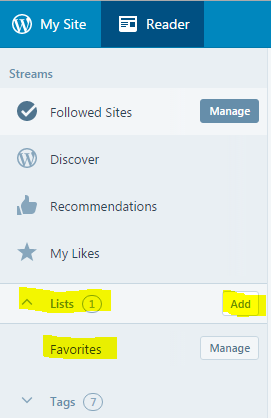
From this same panel, you can also create all kinds of “Lists” or subsets of Blogs. For example, I created a “Favorites” List, which includes my go-to Blogs. When in the Reader, I can simply click on this Favorites List, and only those Blog Posts appear.
To do this, click on “Lists” in the Dashboard and then click “Manage.” From there you can create all kinds of Lists, including your favorite Blogs, or you can group your followed Blogs by tags, or you can create a List of tags to filter the Discover feed.
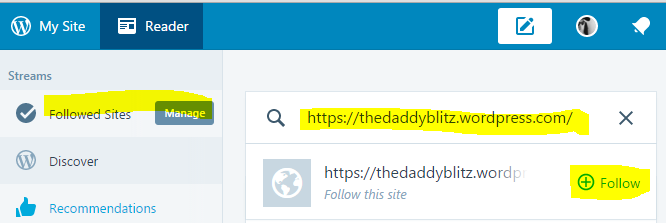
One other nice feature is the ability to add a Blog to your Reader feed manually. This is particularly helpful for non-Wordpress Blogs or for WordPress Blogs where the Blogger does not have the “follow” button function enabled. To do this, click on “Followed Sites” in the Dashboard, then click on “Manage,” then paste the web address (URL) of the Blog you want to follow into the bubble. If it can be followed in the Reader, the Blog will appear with a “+ Follow” beside it. Click the “Follow” button, and that Blog has now been added to your Reader feed. If it is a non-Wordpress site, it will add an RSS feed for the Blog (if available).

10. BLOGROLL AND LINKS
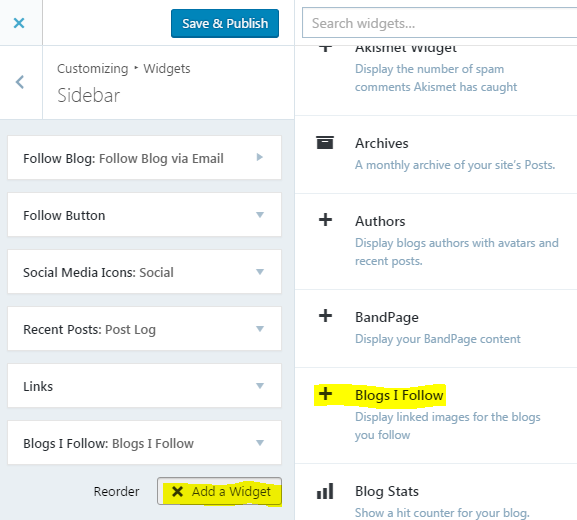
Another nice function is the ability to display a list of Blogs that support you or that you follow. This can be done by adding either the “Blogs I Follow” widget or the “Links” widget. To add the widgets, go to the Dashboard and select “Customize” on “Themes.”

Then select “Widgets.”

You will then be asked whether to add the widget to the Sidebar or Footer of your Theme template.

BLOGS I FOLLOW
The “Blogs I Follow” widget has limited functionality and is really only helpful if you only follow a few sites and all of those you want to prominently display. It will list up to 50 blogs, starting with those you’ve most recently followed. To add this widget, select “Add a Widget” and then “Blogs I Follow.”
Then you will have a limited number of options, such as how many Blogs to display. You can rename the widget as well.

Click “Save,” and the Blogroll should be displayed wherever you placed the widget on your Blog.
LINKS
While a little more cumbersome to set up initially, the “Links” widget is far more useful. This widget allows you to list the exact Blogs (or other links) you want to display and there is no number limit.
Follow the same steps above for adding a widget, but choose “Links” instead of “Blogs I follow.”

There are several options to toggle as shown below.

After adding the Links Widget, you will now need to add the actual links you want to display. To do this, go to “Links” in the Admin Panel (see instructions above). From there, you can add links and even set link categories.

Link Categories (different from your Blog Categories) allow you to display different lists in your widget area. Within the widget, you can choose which Category to display. Now, add the Blog Title and Link manually in the spaces above and choose the Category. When finished, make sure you select which Category of Links to display within the widget settings (either in the general Dashboard or within the Admin Panel):

11. SHORTLINK
There are many occasions for needing a shorter URL for your posts, such as for Twitter. You can find this shortened URL within the WordPress editor. Under “Sharing” you will find the “Shortlink” for your published Blog Post. Simply copy and paste the address where you need it.


12. Read More or Continue Reading
If you want your Blog to display an abbreviated version of your post (instead of the entire post) with a “Read More” or “Continue Reading” link, you will need to add the appropriate code to your post. Fortunately, WordPress has a button for this in the post editor. Within the editor, place your cursor where you want the “Read More” tag to be inserted. Then click on the button highlighted below.

In the visual editor, it will show up in the body of the post as follows:

The Read More tag is actually easier to place in the HTML editor. To get there, click on the “HTML” tab of the editor.

Once in the HTML editor, you will find the following, which is the HTML code for the Read More tag inserted above:

In the HTML editor, you can move or type that code anywhere in the text of the post you would like for it to appear. When you are finished, preview the post to make sure it looks satisfactory (sometimes you will need to add a space before or after it for cosmetic purposes). The abbreviated post should look something like this:

13. EMOJI
Have you ever wondered how commentators add those emoticons or emoji in comments? It’s very simple. Just add the following keystrokes, and the corresponding emoticon or emoji will appear when you submit your comment.
:) |
|
 |
;) |
 |
:D |
 |
XD |
>:D |
|
 |
:( |
 |
:'( |
 |
:| |
:/ |
|
 |
:o |
 |
:P |
 |
>:( |
o_O |
|
 |
8-) |
^^' |
|
 |
<3 |
 |
:? |
 |
=^-^= |
 |
:evil: |
 |
:twisted: |
:mrgreen: |
|
 |
:oops: |
| 🙄 | :roll: |
 |
:idea: |
 |
:!: |
 |
:?: |
 |
:bear: |
 |
:star: |
 |
:arrow: |
14. HOW TO ADD AN IMAGE TO A COMMENT
Ever wanted to add an image to a comment? That’s very easy as well. Just insert the following html code where you want the image to appear:
<img src=”image_url”/>
Add the URL address for your image between the quotation marks. When you submit the comment containing the foregoing code, the image will appear in place of the Code.
15. EMAIL NOTIFICATION MANAGEMENT
Do you get too many email notifications from WordPress? Tired of your email box being littered by all the notifications for “Likes,” and “Follows,” and “Comments”? For me, I prefer my notifications to show up in my Timeline and not in my email. In order to effectively turn off your email notifications, there are several settings in different locations that must be toggled off.
The first place to go is the Admin Panel (see above). There are several places to toggle off email notifications. See images below:

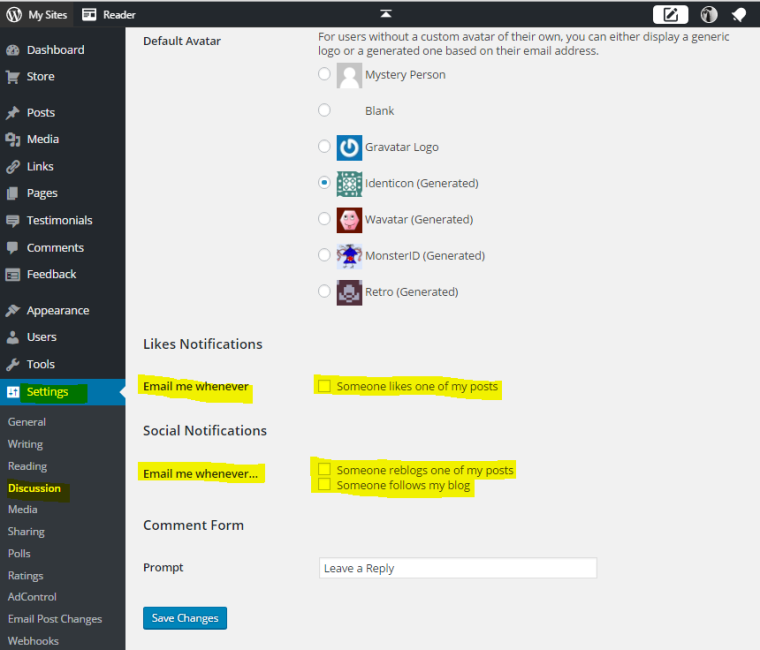
Make sure you click “Save Changes” before exiting.
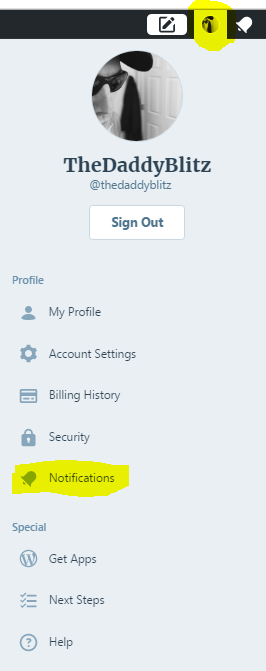
Unfortunately, this did not solve my problem. So, the next place to turn is your Profile Settings either within the mobile app or on the website. From there, select “Notifications,” and there are many types of email notification options to turn on or off.


And the following allows you to set the default email subscription for sites you follow:


Reblogged this on Real as the Streets and commented:
I love TheDaddyBlitz blog. He puts out quality stuff on a regular basis. If you’re new to WordPress or looking to step up your blog game- check his post out! It has great tips for taking your blog to the next level. I strongly encourage you to give it a good look over, you will be glad you did.
LikeLiked by 3 people
Hi, I’m new in this blogging. I need serious assistance in it
LikeLiked by 1 person
Really helpful post – thank you! Loads to digest 😝
LikeLiked by 2 people
This post is a gem for WordPress newbies and not-so-newbies. I’m going to share it and re-share it!
LikeLiked by 1 person
Thanks for the information! I will definitely be using the ones I don’t currently use.
LikeLiked by 2 people
How long does it take to stop being a newbie? You’re right. WP is not very user friendly. Had a hard time too, even if I already had some experience in another blogging service. Thanks for the tips, by the way.
LikeLiked by 2 people
Really helpful post – Thank you 🙂
LikeLiked by 2 people
Thank you, I really have learned a tremendous amount….
LikeLiked by 2 people
I didn’t use the reader until MUCH later than I should have. I didn’t really realize what it was. After I started using it, started following people, I began to see new followers, it was AMAZING. Definitely the Number 1 thing for new bloggers to know. As I like to say, “spread the love.”
LikeLiked by 2 people
Most of my followers came from the Reader in response to my following them and commenting on their posts. It’s a whole lot harder accumulating followers outside the WordPress world. One can accumulate thousands of followers from the Reader alone. Great way to get started. You have to expand beyond that eventually if you want a huge following, but the Reader will give a solid foundation.
LikeLiked by 1 person
Yes, absolutely!
LikeLiked by 1 person
This is really helpful, although I have already handled many of these. The WP reader/manage site must be acting up because I couldn’t add a list, at least it wouldn’t save, and I couldn’t figure out how to pinpoint particular bloggers for the list. Will try again later. Thanks for the great post!
LikeLiked by 1 person
I’ve had trouble with list creation and editing on the mobile app. If I encounter a problem, I just browse to WP in an internet browser and that solves most issues. I’ve found the mobile app to be glitchy in several areas. To add a Blog to a list, simply copy and paste the URL address for the Blog in the list manager:
LikeLiked by 2 people
I will give that a try, and I was on my desktop–I should be better at this, LOL!
LikeLiked by 2 people
Using the desktop app or just an Internet browser? I never use the desktop app.
LikeLiked by 1 person
no, on my desktop fully, with my site open, and the reader. Sometimes WP is slow to load, I’ve noticed.
LikeLiked by 2 people
Might could use an old fashioned CPU reboot. My work computer will drag from time to time and a reboot solves it.
LikeLiked by 1 person
No, operator error as usual–needed to hit “enter!” Working great!
LikeLiked by 2 people
🙂
LikeLike
Great post, wish I had this in the, early days ☺
LikeLiked by 2 people
Yep, definitely for newbies. But some veterans have found a nugget or two as well.
LikeLiked by 1 person
Definitely… ☺
LikeLiked by 2 people
Thanks for posting. I just got to #3. For the life of me, I could not figure out how to create a separate menu tab for Daily Prompts as I did not want them grouped with my regular posts, so I usually just trash them after a few days so they don’t clog my post list. When I am more alert, I will see if I can follow these instructions. I also wanted to create a tab for sermon notes.
LikeLiked by 1 person
You could do that easily by adding Categories to your menu bar and adding those categories to your posts.
LikeLiked by 1 person
Awesome tips for a first time blogger like me!
LikeLiked by 2 people
Very helpful! Thanks for sharing 🙂
LikeLiked by 2 people
Love this! Great info all in one place. I look forward to implementing some of these on my page.
LikeLiked by 2 people
Thanks for sharing.. I needed the tips- just getting started..
LikeLiked by 2 people
Thank you so much for sharing this! It is very helpful! I just started blogging and having this summary is great, especially because I don’t have much time to dedicate to it. Thank you!
LikeLiked by 2 people
Thank you so much for sharing this information. I did not know the number of tags/categories were limited to 15 total. I am going back to edit some of my posts to ensure they meet this requirement. Have a wonderful day! ~ dp
LikeLiked by 2 people
You are very welcome. Yes, many, many people overlook the 15. I always check the Reader after publication to make sure my post shows up. I’ve had to delete tags in the past.
LikeLiked by 1 person
Reblogged this on Souljaz 4 Christ Ministries and commented:
Great tips worth checking out!
LikeLiked by 1 person
These are wonderful, DaddyBlitz! I hope you don’t mind me sharing with my student bloggers 🙂
LikeLiked by 2 people
Thanks for taking the time to point out these beneficial tips for WordPress users. 🙂
LikeLike
This is a really great article. As a complete newbie to blogging and wordpress and not clued up on the tech side of it at all, I have found lots of useful advice in this post which I am sure will help develop my blog. Thanks
LikeLiked by 2 people
Thank you. I’m a newbie blogger and these tips have been so helpful.
LikeLiked by 2 people
One of the MOST helpful posts about getting around WordPress, 6 months in and I’m still learning so much! Thank you for taking the time to put this together it has already really helped!
LikeLiked by 1 person
Wow i wish i read this before starting my blog The Opinionated Dad
LikeLiked by 1 person
It was a great help. Thanks 😊
LikeLiked by 2 people
Great post and very helpful! 😀
LikeLike